'Tis the season for card-making, buying, selling, writing, sending, and receiving! I'm not sure which of the wise guys brought stationary (I imagine it wasn't quite mobster enough, so he went halfsies on the frankincense, and hung back to watch the car), or perhaps society is still paying tribute to the spirits of trees-passed, but lucky for this paper-nerd, cards have certainly moseyed their way up to becoming a top-notch wintry tradition.
While brainstorming for a holiday card order--to be of a "happy winter," and strictly secular persuasion--I rattled through my mental (and virtual) folders of classic crafts and got glossy-eyed over the joy and nostalgia of paper snowflakes. . . That is, until I spent an hour being reminded of why I stopped making them after the age of seven. Throughout the course of life, we find that there are a number of things that do not come naturally to us. Usually, if it involves paper and/or crafting, I can at least wing-it to a very passable degree. But man, I suck at making those fiddly little snowflake buggers! So after sacrificing said hour to my mounting frustration, I reminded myself of the (improvisational) skills that I am good at, whipped up a template and a series of paper-cuttings from some beautiful examples I found online, and turned that into my first experience with creating a hand-carved stamp. *Phew!*
I used a basic Speedball starter kit, despite the lower rubber quality, because it's incredibly forgiving and easy to cut (as soon as I touched the carving tool, I had flash-backs to slicing my hand up in 7th grade--that's year 8, for the Brits--while working on lino cuts, so I was enthused about avoiding a repeat). I just used my paper cut as a stencil, and traced the lines out directly with my exacto knife, marking the areas to be taken out by cutting an "X" on them (because I get all sorts of easily confused when it's passed 11 o' clock at night). After it was all marked up, it was really just a matter of patience and impending eye-strain, carefully scooping out the excess rubber--very satisfying, oddly enough.
When the stamp was done (and my brain was numb), I inked it up by bringing the ink pad to it, rather than the stamp to the pad. ColorBox uses pretty oily, and therefore slightly heavier ink, and gravity helps a lot in application. It pays to store the pads upside down, to keep the ink at the top (you get around a hundred more stamps out of them this way), and for the same reason, it's more effective to ink a large stamp in the same manner. Plus, you can better manage an equal distribution, not to mention actually see what you're doing. Because the rubber's not great on these, it does take a lot of ink, but if you "dab" an extra layer on top, it will stick to the paper much better. Next, I brought my paper to the stamp, just like the ink. This is mostly just so you can see what you're doing, but I think it helps a lot in weight/pressure distribution, and in not making a complete mess of my table/mat and inevitably my paper. Not that making a mess isn't fun (flour fight, anyone?).
Once again, because of the type of rubber (and because I didn't think ahead far enough to go buy a roller, which would have made everything go a lot quicker--psh, who has a hundred other things to do other than craft?? Nobody), the stamp typically delivered a "weathered" print, but vintage is IN, man . . .
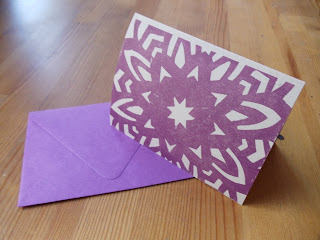
and, of course, you learn pretty quickly how much pressure is needed to transfer a more even print. So, ta da! Here is the result of my experiment with hand-stamping.
And here are the four colours I used, clockwise from the front: Robin's Egg (which turned out as a pretty, frost-like colour against the Paper Bag card), Scarlet, Moss, and Eggplant. Each card was then paired with a corresponding colour envelope.
And so a small blizzard of snowy cheer was created, "each its own individual expression of the beauty of winter" as I imagine Hallmark would say (in a terribly sweet voice. . . probably that of a child with an adorable speak impediment).
Happy Winter!


No comments:
Post a Comment