I would like to extend a hearty thank you to everyone who has been behind Warren Tales as we've slowly made our way out of the rabbit hole: your energy and support has helped to turn a positively nerdy obsession with paper craft into late-night brainstorming sessions, and on into the productivity of an emerging business. It is a true pleasure to work with and for all of you.
My biggest appreciation goes out to my coworker and friend, Izak Lazarowski, for his amazing work on designing our handsome Warren--may he always be a fine example of elegance and cool.
And so, I raise a binary glass and welcome everyone to the shop!

Friday, February 11, 2011

Thursday, February 3, 2011
Boxing With Book Board: Fistycuffs 'Til Dawn
Last week I decided to try my hand at making a set of stationary boxes. It was an idea I'd been sitting on for a while, and I was excited to start experimenting, but I'll admit that it proved a little more challenging than I had initially expected! My attempt was at a drawer-pull box, and although they turned out nicely, it was a period of long hours and long faces that I won't soon forget...

{The most effective way of cutting book board--short of an industrial cutter or a vice-grip-and-saw set-up--is by making 5 or 6 passes with a craft-knife, and using a metal ruler as a guide. You will want to do your cutting on a sturdy surface, as you typically end up using your body weight to keep the book board in place while cutting; you will want to use a sharp blade, even though it will probably dull in process; and you will want to cut on top of a cutting mat/board/already-highly-damaged-table-that-has-no-monetary-or-sentimental-value. I have been cutting on a mirror panel, but despite feeling a little Scarface (whether for better or worse) when embossing powder comes into play, it has been very unkind to my blades so I will be upgrading to a self-healing mat when I get the chance.}
Cutting out a piece of book board is highly arduous and frustrating, let alone 22 of them. Therefore, I really hope to live by my "New Project Resolution" and spread the process over several mornings/afternoons, and certainly not between only two shifts both dragging from 10pm-5am.
The stationary box was to have an outer box and an inside drawer, which could be opened by a ribbon pull. Here is the makings of the outer box (minus the lid, and already covered) and the inner drawer (minus the front panel), and a display of how one fits inside the other:


{Fixing book board together to make a box is really as simple as gluing it in place. I 100% recommend using PVA glue for all paper crafting (that involves the use of glue, rather that tape adhesives or stitching): it's a really versatile, quick-drying, and flexible glue that goes on easily, allows for a quick interval of last minute readjustment, and holds firmly. It's non-toxic and all that wonderful stuff.}
The idea is to bring the drawer measurements marginally past those of the box, so that when the front panel (which will include the ribbon pull) is in place, it will neatly cover the whole front of the box.
The issues I had right from the get-go were consistently with confused measurements; I was at the whim of my own design doodles scribbled onto scrap paper, and it was neither pretty nor time effective. Something in particular I had to tackle was the simple mistake of not anticipating the width of the book board within the box and drawer, and not factoring them into my specifications. Big "grr" moment, right there. I din't find this out until I put the first drawer together and discovered it was too small to fit the very note cards I had measured it for, but I was able to salvage the evenings work by cutting two new walls and tweaking their position on the base board.
From my mistakes, I have learned to round up in my estimations when working with book board and untested measurements, because it never hurts to have the wiggle room (when trying something new) and it is far easier to take away extra materials than try to add them.
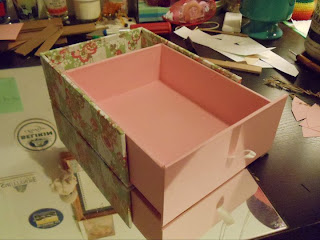
{Covering a box, or book board in general is really simple: apply a roughly even layer of glue (coughPVAcough) and stick. If you're covering something to exact specifications, you'll want to measure everything out and be extra careful in your placement; but if you are covering something that will feature end papers (a smaller layer/page that is glued onto the in-progress side of the board as a way of finishing and cleaning it up) then a rough estimate and cut-out is perfectly adequate (as the evidence of the work will be hidden). As you adhere the paper/material to the board, smooth wrinkles from the middle-out with an even amount of pressure and you should be looking good!}
Covering the stationary boxes took some strategizing, and I eventually decided on a 3-part cover for the outer box, and a 1-part cover for the drawer (not including the front panel, which was covered and added separately). The thing I had to consider was where the "seams" were going to show on the boxes. For the outer box: by covering the top and bottom separately, and the side boards as a single unit, I was able to ensure that the seams would be inside the box and therefore invisible, and that the lines that would show on the outside would be along the natural joint between the pieces--I used end papers inside the outer box to make sure the drawer would not snag the lining, and so it looked deliberate and nice for those who peeked inside. For the drawer: I used one large piece of (very carefully measured and cut) paper to wrap around from the bottom and up around the sides into the middle, with a rectangle cut to cover the base--the only seams were, once again, along the natural joints of the board.
For the front panel, I simply measured out a rectangle of book board that fully covered the front of the stationary box, cut a slit for (and threaded) the ribbon, covered the panel, and adhered it in place at the front of the drawer.
I recommend waiting to attach the top of the outer box to the whole until the very end--this allows for complete visibility and great maneuverability throughout the entire process--but each kind of box is going to be different and this tactic might be more or less helpful, depending.
Tada!


While I like how the drawer-pull stationary boxes turned out, they use a lot of book board and are therefore quite heavy, so I like the idea of leaning more towards lidded or clam/presentation boxes in the future.

{The most effective way of cutting book board--short of an industrial cutter or a vice-grip-and-saw set-up--is by making 5 or 6 passes with a craft-knife, and using a metal ruler as a guide. You will want to do your cutting on a sturdy surface, as you typically end up using your body weight to keep the book board in place while cutting; you will want to use a sharp blade, even though it will probably dull in process; and you will want to cut on top of a cutting mat/board/already-highly-damaged-table-that-has-no-monetary-or-sentimental-value. I have been cutting on a mirror panel, but despite feeling a little Scarface (whether for better or worse) when embossing powder comes into play, it has been very unkind to my blades so I will be upgrading to a self-healing mat when I get the chance.}
Cutting out a piece of book board is highly arduous and frustrating, let alone 22 of them. Therefore, I really hope to live by my "New Project Resolution" and spread the process over several mornings/afternoons, and certainly not between only two shifts both dragging from 10pm-5am.
The stationary box was to have an outer box and an inside drawer, which could be opened by a ribbon pull. Here is the makings of the outer box (minus the lid, and already covered) and the inner drawer (minus the front panel), and a display of how one fits inside the other:


{Fixing book board together to make a box is really as simple as gluing it in place. I 100% recommend using PVA glue for all paper crafting (that involves the use of glue, rather that tape adhesives or stitching): it's a really versatile, quick-drying, and flexible glue that goes on easily, allows for a quick interval of last minute readjustment, and holds firmly. It's non-toxic and all that wonderful stuff.}
The idea is to bring the drawer measurements marginally past those of the box, so that when the front panel (which will include the ribbon pull) is in place, it will neatly cover the whole front of the box.
The issues I had right from the get-go were consistently with confused measurements; I was at the whim of my own design doodles scribbled onto scrap paper, and it was neither pretty nor time effective. Something in particular I had to tackle was the simple mistake of not anticipating the width of the book board within the box and drawer, and not factoring them into my specifications. Big "grr" moment, right there. I din't find this out until I put the first drawer together and discovered it was too small to fit the very note cards I had measured it for, but I was able to salvage the evenings work by cutting two new walls and tweaking their position on the base board.
From my mistakes, I have learned to round up in my estimations when working with book board and untested measurements, because it never hurts to have the wiggle room (when trying something new) and it is far easier to take away extra materials than try to add them.
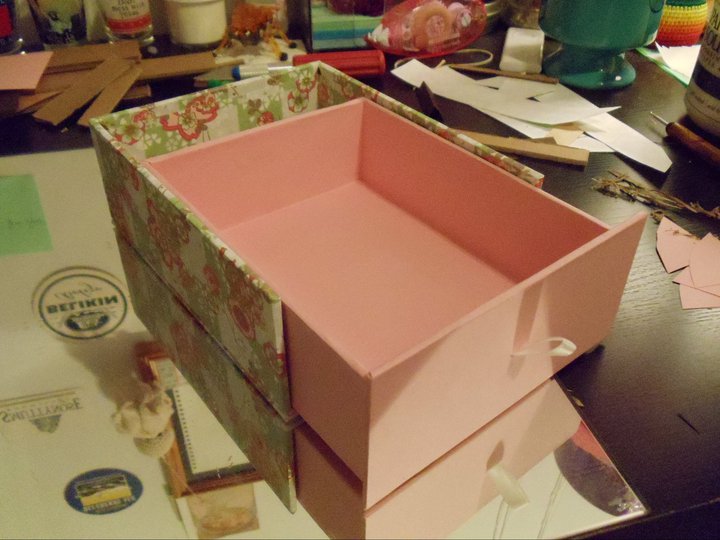
{Covering a box, or book board in general is really simple: apply a roughly even layer of glue (coughPVAcough) and stick. If you're covering something to exact specifications, you'll want to measure everything out and be extra careful in your placement; but if you are covering something that will feature end papers (a smaller layer/page that is glued onto the in-progress side of the board as a way of finishing and cleaning it up) then a rough estimate and cut-out is perfectly adequate (as the evidence of the work will be hidden). As you adhere the paper/material to the board, smooth wrinkles from the middle-out with an even amount of pressure and you should be looking good!}
Covering the stationary boxes took some strategizing, and I eventually decided on a 3-part cover for the outer box, and a 1-part cover for the drawer (not including the front panel, which was covered and added separately). The thing I had to consider was where the "seams" were going to show on the boxes. For the outer box: by covering the top and bottom separately, and the side boards as a single unit, I was able to ensure that the seams would be inside the box and therefore invisible, and that the lines that would show on the outside would be along the natural joint between the pieces--I used end papers inside the outer box to make sure the drawer would not snag the lining, and so it looked deliberate and nice for those who peeked inside. For the drawer: I used one large piece of (very carefully measured and cut) paper to wrap around from the bottom and up around the sides into the middle, with a rectangle cut to cover the base--the only seams were, once again, along the natural joints of the board.
For the front panel, I simply measured out a rectangle of book board that fully covered the front of the stationary box, cut a slit for (and threaded) the ribbon, covered the panel, and adhered it in place at the front of the drawer.
I recommend waiting to attach the top of the outer box to the whole until the very end--this allows for complete visibility and great maneuverability throughout the entire process--but each kind of box is going to be different and this tactic might be more or less helpful, depending.
Tada!


While I like how the drawer-pull stationary boxes turned out, they use a lot of book board and are therefore quite heavy, so I like the idea of leaning more towards lidded or clam/presentation boxes in the future.
Friday, January 21, 2011
Love Letters
Whether you burst with displays of every-shade-of-red affection, or steer clear of cupid's confetti on February 14th, Valentine's Day survives to provide us with an excuse or reason to give cute things to people we have enjoyed spending time with. A gesture of appreciation.
Give the gift of opening and experiencing personal, tangible mail to someone you care about this greeting-card season, or do one better and treat them to a card set so they can send the gesture on (and back to you, too, of course).
Support snails, send mail!
Product:


{You Spin My Wheels}


Packaging Specifications:
~Single cards, whether flat or folded, come with a corresponding envelope and are housed and delivered in a protective sleeve.
~Note card sets feature single-sheet "flat cards" (open, greeting-card-like "folded cards" are available at an adjusted price, and customized cards or envelopes are also available at an adjusted price). A set consists of 10 cards and 10 corresponding envelopes, and each set is housed and delivered in a chocolate-brown box mailer, within a white tissue paper wrap.
~Correspondence sets feature 5 sheets of unfolded writing paper and 5 half-size envelopes. Sets are housed and delivered within a protective paper wrapping and tied with ribbon.
Give the gift of opening and experiencing personal, tangible mail to someone you care about this greeting-card season, or do one better and treat them to a card set so they can send the gesture on (and back to you, too, of course).
Support snails, send mail!
Product:
{my best friend, my boyfriend, my love}
Single card: measures 3 1/2" x 4 7/8", with corresponding envelope
Colours: Luxe White (textured) card; Gravel envelope

{my best friend, my girlfriend, my love}
Single card: measures 3 1/2" x 4 7/8", with corresponding envelope
Colours: Luxe White (textured) card; Gravel envelope

{You Spin My Wheels}
Single card: measures 3 1/2" x 4 7/8", with corresponding envelope
Colours: Luxe White (textured) card; Gravel envelope; Light Pink and Deep Pink paper; Cranberry bicycle

{Spooning Leads To Forking}
Note Card Set: Cards measure 4 1/4" x 5 1/2" with corresponding envelopes
Colours: Luxe White (textured) card; Red envelopes; Cranberry spoon and fork

{Get Lucky Fortune}
Note Card Set: Cards measure 4 1/4" x 5 1/2" with corresponding envelopes
Colours: Luxe White (textured) card; Beet envelopes; Eggplant fortune cookie
Each card features one of the following phrases: Bite; Toy; Lick; Thrust; Moan; Strip; Hard; Stroke; Come; XXX.


{Morse Code I Love You}
Correspondence Set: Writing papers measure 5 1/2" x 8 1/2" with half-size envelopes
Colours: Soft White paper; Paper Bag envelopes


Pricing:
{my best friend, my boyfriend, my love} - $3.00
{my best friend, my girlfriend, my love} - $3.00
{You Spin My Wheels} - $4.00
{Spooning Leads To Forking} - $12.00
{Get Lucky Fortune} - $12.00
{Morse Code I Love You} - $6.00
Shipping:
{my best friend, my boyfriend, my love} - $0.50
{my best friend, my girlfriend, my love} - $0.50
{You Spin My Wheels} - $0.50
{Spooning Leads To Forking} - $2.00
{Get Lucky Fortune} - $2.00
{Morse Code I Love You} - $1.50
~Single cards, whether flat or folded, come with a corresponding envelope and are housed and delivered in a protective sleeve.
~Note card sets feature single-sheet "flat cards" (open, greeting-card-like "folded cards" are available at an adjusted price, and customized cards or envelopes are also available at an adjusted price). A set consists of 10 cards and 10 corresponding envelopes, and each set is housed and delivered in a chocolate-brown box mailer, within a white tissue paper wrap.
~Correspondence sets feature 5 sheets of unfolded writing paper and 5 half-size envelopes. Sets are housed and delivered within a protective paper wrapping and tied with ribbon.
Thursday, January 6, 2011
I Resolve To Keep In Better Contact
What better way to greet the new year than with new note card sets!
Warren Tales note card sets feature single-sheet "flat cards" (open, greeting-card-like "folded cards" are available at an adjusted price, and customized cards or envelopes are also available at an adjusted price). A set consists of 10 cards and 10 corresponding envelopes, and each set is housed and delivered in a chocolate-brown box mailer, within a white tissue paper wrap.


Pricing:
Warren Tales note card sets feature single-sheet "flat cards" (open, greeting-card-like "folded cards" are available at an adjusted price, and customized cards or envelopes are also available at an adjusted price). A set consists of 10 cards and 10 corresponding envelopes, and each set is housed and delivered in a chocolate-brown box mailer, within a white tissue paper wrap.
Product:
{Simple Thank You}
Cards measure 3 1/2" x 4 7/8", with corresponding envelopes
Colours: Luxe Frost (textured) card; Gravel envelope


{Put The Kettle On}
Cards measure 4 1/4" x 5 1/2" with corresponding envelopes
Colours: Luxe Frost (textured) card; Night envelope; Night Sky kettle


{Golf}
Cards measure 4 1/4" x 5 1/2" with corresponding envelopes Colours: Khaki card with; Moss envelope; Watermark golfer, heat embossed


{Carousel}
Cards measure 5" x 7" with corresponding envelopes
Colours: Luxe White card and envelope; Metallic Gold carousel, heat embossed


Pricing:
{Simple Thank You} - $10.00
{Put The Kettle On} - $12.00
{Golf} - $12.00
{Golf} - $12.00
{Carousel} - $14.00
Shipping:
{Simple Thank You} - $1.60
{Put The Kettle On} - $1.90
{Golf} - $1.90
{Golf} - $1.90
{Carousel} - $2.20
Saturday, December 25, 2010
Merry Craftmas
A big happy holidays to everyone celebrating Christmas today, and belated/early tidings of merriment to those who celebrate otherwise.
You may have noticed that I in fact did not update the blog with new product, as I optimistically intended. To you fine, observant individuals, I apologize. But do not fret, Warren Tales will be back in full and happy swing after the holly-days of snowy fun and home cooking are passed, with a small taste of book binding, to boot!
So in the mean time, sit pretty, stay merry, and wave goodbye to all that seasonal stress.
You may have noticed that I in fact did not update the blog with new product, as I optimistically intended. To you fine, observant individuals, I apologize. But do not fret, Warren Tales will be back in full and happy swing after the holly-days of snowy fun and home cooking are passed, with a small taste of book binding, to boot!
So in the mean time, sit pretty, stay merry, and wave goodbye to all that seasonal stress.
Tuesday, December 14, 2010
12 Days of Christmas
Christmas is quickly approaching, but there is still time to buy some last minute gifts!
The automated machines at USPS tell me that domestic shipping will take 3 days to arrive; so when you add the few extra that an order will probably take to make its way through the windy world of holiday mail, you're left with about 4-7 more days of shopping possibilities.
Some new note card sets are being added to the catalog this week and include a little tea time fun, child's play, good fortune, vintage golf, and some new dandelion and wood grain products, so check back soon for pictures. Of course, if you're interested in any of these and working against the clock, you can email me and I will get the preview and product ready on a rush order.
Don't forget to steer clear of pear trees today, as there will be plenty of partridges a-pooping.
The automated machines at USPS tell me that domestic shipping will take 3 days to arrive; so when you add the few extra that an order will probably take to make its way through the windy world of holiday mail, you're left with about 4-7 more days of shopping possibilities.
Some new note card sets are being added to the catalog this week and include a little tea time fun, child's play, good fortune, vintage golf, and some new dandelion and wood grain products, so check back soon for pictures. Of course, if you're interested in any of these and working against the clock, you can email me and I will get the preview and product ready on a rush order.
Don't forget to steer clear of pear trees today, as there will be plenty of partridges a-pooping.
Wednesday, December 8, 2010
Etsy
Warren Tales is now active on Etsy!
While this blog will continue to act as the main forum for Warren Tales paper craft and discussion, the new Etsy branch will enable me to not only process payments, but keep track of orders by means other than a colony of post-it notes and paper scraps (although I have so far enjoyed my increasingly colourful wall).
I have kicked off the posting process with some of the products you have expressed the most interest in, as well as a few new ones to keep things interesting. New updates will be made regularly and stock will be replenished according to demand, so be sure to check back whenever you can (particularly holiday shoppers)!
Without further ado, follow me down the rabbit hole...
While this blog will continue to act as the main forum for Warren Tales paper craft and discussion, the new Etsy branch will enable me to not only process payments, but keep track of orders by means other than a colony of post-it notes and paper scraps (although I have so far enjoyed my increasingly colourful wall).
I have kicked off the posting process with some of the products you have expressed the most interest in, as well as a few new ones to keep things interesting. New updates will be made regularly and stock will be replenished according to demand, so be sure to check back whenever you can (particularly holiday shoppers)!
Without further ado, follow me down the rabbit hole...
Subscribe to:
Posts (Atom)