Sunday, September 18, 2011

I'm a Business, Man

Warren Tales now has business cards!

Printed on luxe white (textured) card stock (210g weight, I believe), with rounded corners.

I'm looking toward getting a stamp made some time in the upcoming future, mainly for use as a tag on the back of Warren Tales products themselves, but for the purposes of business cards, I could not be happier with how these turned out, and I'm so glad to have made them myself! Seems fitting, after all.


Warren Tales postcards are also available!

Thursday, September 15, 2011

Warren Tales Around the World

As I clumsily plod my way through the ins and outs of starting a small company, I find myself getting an unintentional crash course on a business approach to the internet, also. While I enjoy claiming that I "don't need" the internet (no matter how much time I dedicate to my meticulously organized Pinterest account, or the sincere and loving, yet tragically lackluster effort I make to keep up with friends and family I no longer have the pleasure of sharing a town with), I also don't need the headache that comes with trying to figure everything out on your own. For example, spreadsheets typically make me nauseous. Solution: a web-based data analysis program. 

And so, my favourite new "business" tool has been Google Analytics. This incredibly useful program provides me with reports on site traffic, visitation lengths, and a whole bushel of other such practical information like search term referrals. Rather than focusing on how to best use this wealth of information to do something practical, like boost visitation, however, I seem to be overwhelmingly taken with one, seemingly trivial report: Map Overlay.

This report gives me the geographic location of the blog's visitors, down to the city (it's all a little less creepy than it sounds, but when you actually think about it, probably not that much less...it really is pretty weird). But more important than any 1984 grumblings one tends to feels about the collection of this information, is the absolute joy I receive each time I get the chance to see where followers and supporters of Warren Tales come from.

I can't adequately express my appreciation for everyone who has supported me in my efforts to bring this passion for paper to life, but hopefully an earnest thank you will be a good enough start.

Thank you.


Clearly, Warren Tales has been getting a lot of love, and it's my pleasure to bring it on back to you with a new line of location cards. All cards are hand-stitched and feature a colourful X-marks-the-spot over your humble abode, as well as a typed caption, below. These folded cards measure 3 1/2" x 4 7/8" and come with a corresponding kraft envelope. Cards are typically made on superfine soft white stock (with the exception of an island, for which I would be very tickled to make a splash with pool blue--da dum chee!), but state/country and border colours vary. Cards cost $5 each, or $12 for 3 (not including shipping), and orders will be processed as a reserved purchase through Etsy. Contact me at warrentales@gmail.com with any questions and requests, and let's get some snails in the mail!

BUT there's a catch! I will only make cards for cities that appear on my darling Map, and I will only take orders through warrentales@gmail.com (this is a blog-o-love exclusive, so only the purchase transaction itself will go through Etsy). This won't be any problem if you are interested in the city you are currently reading this in, but if you want to send something sweet to a friend or loved one across the state, country, or globe; or are daydreaming of a favourite getaway, then you're going to have to spread the word! 


For the most up-to-date list of places where wonderful people live, and cities that are thus eligible for these customized cards, check out the "Credit Where Credit is Due" sidebar to the right.

Monday, August 29, 2011

Out of Sight, But Not Out of Mind -- Or Work

Although my online presence has been less than omniscient these days, I've had some great custom orders, including my two biggest to-date, and I'm excited to finally share them with the world. So, as I close out day two in my hurricane Irene protective bubble, I can't think of a better time to catch you up on some of the projects I've worked on over the last few months...

First up was a round of graduation announcements for a Northern Arizona University undergraduate. These were my first adventure into printed products, and it couldn't have gone any better.


I pulled from a specific pallet to match the school colors, and used a very simple border design to compliment the rounded corners of the card. Choosing the correct font style was also an important decision, as it needed to fit in to the brown-paper-packages-tied-up-with-string, favorite things (minus the edelweiss) aesthetic I was going for. Eventually, I settled on something formal, yet light-hearted and hand-written--a thin and short, cursive text (unfortunately the name of the font is escaping me at this moment, but I will add it as an edit at a later time). Finally, to incorporate the hands-on element, I used textured white card, tied with a neutral hemp yarn (to emphasize the printed colors), and a grooved, brass-colored button to make it "pop" (a very technical crafting term, clearly). Each card was then delivered in a navy envelope, and a gold paint-pen was provided for addresses (not pictured).

This style is great for event announcements, as the tied package design is ideal for keeping multiple information cards together; or as a way of giving texture to a single card, as exemplified here.

For a set of 60, this order came to $120 (price subject to change according to material costs)

----------

Next up was a graduation gift combining a hanging frame with the individual's interest in antique keys. I had found an amazing array of old brass keys (check out Village Renewal in Brookline Village, MA for a variety of treasures), and the premise of this combination came from wanting a nicer way to present and display them than by the handful, but still having the option to take them out and enjoy them individually. What I settled on was a retractable frame with wire ties that would allow each key to be held inconspicuously and removed easily.


It's a pretty simple construction involving a base layer, some inner scaffolding, and an outer frame (the tray involves the same), all covered much in the same way as one would approach book binding, using two different hand-made decorative papers. I installed the ribbon hanger through an incision in the base layer, used an awl to puncture a series of holes, and thin but durable copper wire (resistant to breakage with use) to twisty-tie and secure the keys. The outer frame keeps the tray in place, and by undercompensating on the tray's inner scaffolding, the frame all sits evenly! The only issue I had with this frame was not having quite enough wire connectors on some of the smaller keys (causing them to swivel when moving the tray around), but that's an easy fix. Needless to say, both I, and the graduate were very pleased with the final product.

I would estimate this price of this frame (9"x6") to be around $40 (not including the keys), but the price would very much depend on the dimensions.

----------

Last of all, wedding thank you's! The biggest Warren Tales request, to-date, went to a wonderful couple in California, this month. For a country wedding, we went with a simple and clean, but weathered aesthetic.


A smooth superfine soft white card with rounded corners, featuring the bride and groom's names typed (on a typewriter, of course) on the front and accompanied by a faded harbor boot stamp, as well as a light blue hemp yarn double-tie over the spine, tied with a knot (no pun intended, but always appreciated). Each of these cards were paired with a paper bag envelope, and bound in bundles of ten with a personalized "Mr. & Mrs." wrap (also typed).

For a set of 120, this order came to $300 (price subject to change according to material costs)

Saturday, August 27, 2011

Pleasing Mr. Postman: Savoring letter-writing in digital age - The Boston Globe

I am excited to announce that snail mail (and Warren Tales) made the front page of The Boston Globe, today! Several mail enthusiasts, including myself, were interviewed about our love and use of the postal system, and our feelings concerning 3,600 possible USPS location closures. It's a wonderful little article, written by Boston Globe correspondent, Anna Marden, and will hopefully inspire many more people to try their hand at letter-writing.


Monday, March 7, 2011

You Smell More Like Cake Than A Monkey...Are You Sure It's Your Birthday?

Happy birthday to you, happy birthday to you, it sounds like you're growing up and looks like it too!

A friend of mine from High School recently came to me with a custom invitation order for her son's 3rd birthday, and it proved to be a wonderful opportunity to make use of a little layering, texture, and recycling. I combined card stock, old book pages, and embroidery thread, along with the Warren Tales typewritten aesthetic, to produce these wonderful invitations:


Custom invitations are a great way to express yourself and your celebration.

And to express myself, I say:

               Happy birthday, Caleb!

Friday, February 11, 2011

There's Nothing I Like More In Life Than A Gentleman Animal

I would like to extend a hearty thank you to everyone who has been behind Warren Tales as we've slowly made our way out of the rabbit hole: your energy and support has helped to turn a positively nerdy obsession with paper craft into late-night brainstorming sessions, and on into the productivity of an emerging business. It is a true pleasure to work with and for all of you.

My biggest appreciation goes out to my coworker and friend, Izak Lazarowski, for his amazing work on designing our handsome Warren--may he always be a fine example of elegance and cool.

And so, I raise a binary glass and welcome everyone to the shop!

Thursday, February 3, 2011

Boxing With Book Board: Fistycuffs 'Til Dawn

Last week I decided to try my hand at making a set of stationary boxes. It was an idea I'd been sitting on for a while, and I was excited to start experimenting, but I'll admit that it proved a little more challenging than I had initially expected! My attempt was at a drawer-pull box, and although they turned out nicely, it was a period of long hours and long faces that I won't soon forget... 


{The most effective way of cutting book board--short of an industrial cutter or a vice-grip-and-saw set-up--is by making 5 or 6 passes with a craft-knife, and using a metal ruler as a guide. You will want to do your cutting on a sturdy surface, as you typically end up using your body weight to keep the book board in place while cutting; you will want to use a sharp blade, even though it will probably dull in process; and you will want to cut on top of a cutting mat/board/already-highly-damaged-table-that-has-no-monetary-or-sentimental-value. I have been cutting on a mirror panel, but despite feeling a little Scarface (whether for better or worse) when embossing powder comes into play, it has been very unkind to my blades so I will be upgrading to a self-healing mat when I get the chance.}

Cutting out a piece of book board is highly arduous and frustrating, let alone 22 of them. Therefore, I really hope to live by my "New Project Resolution" and spread the process over several mornings/afternoons, and certainly not between only two shifts both dragging from 10pm-5am.

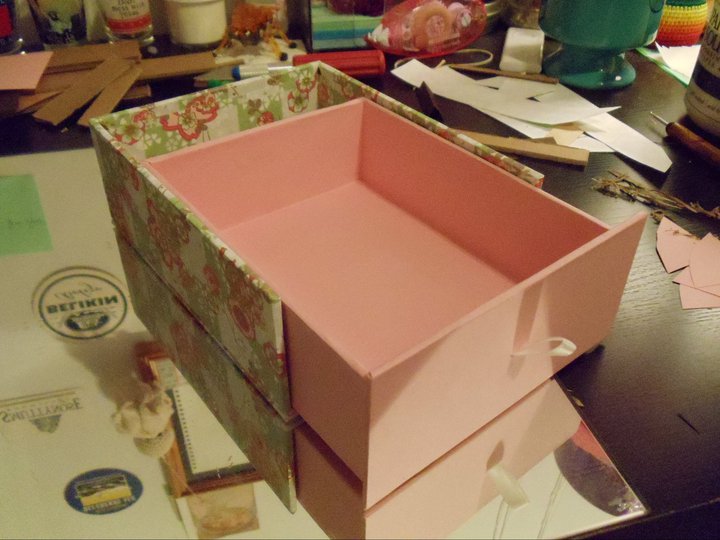
The stationary box was to have an outer box and an inside drawer, which could be opened by a ribbon pull. Here is the makings of the outer box (minus the lid, and already covered) and the inner drawer (minus the front panel), and a display of how one fits inside the other:


{Fixing book board together to make a box is really as simple as gluing it in place. I 100% recommend using PVA glue for all paper crafting (that involves the use of glue, rather that tape adhesives or stitching): it's a really versatile, quick-drying, and flexible glue that goes on easily, allows for a quick interval of last minute readjustment, and holds firmly. It's non-toxic and all that wonderful stuff.}

The idea is to bring the drawer measurements marginally past those of the box, so that when the front panel (which will include the ribbon pull) is in place, it will neatly cover the whole front of the box.

The issues I had right from the get-go were consistently with confused measurements; I was at the whim of my own design doodles scribbled onto scrap paper, and it was neither pretty nor time effective. Something in particular I had to tackle was the simple mistake of not anticipating the width of the book board within the box and drawer, and not factoring them into my specifications. Big "grr" moment, right there. I din't find this out until I put the first drawer together and discovered it was too small to fit the very note cards I had measured it for, but I was able to salvage the evenings work by cutting two new walls and tweaking their position on the base board.

From my mistakes, I have learned to round up in my estimations when working with book board and untested measurements, because it never hurts to have the wiggle room (when trying something new) and it is far easier to take away extra materials than try to add them.


{Covering a box, or book board in general is really simple: apply a roughly even layer of glue (coughPVAcough) and stick. If you're covering something to exact specifications, you'll want to measure everything out and be extra careful in your placement; but if you are covering something that will feature end papers (a smaller layer/page that is glued onto the in-progress side of the board as a way of finishing and cleaning it up) then a rough estimate and cut-out is perfectly adequate (as the evidence of the work will be hidden). As you adhere the paper/material to the board, smooth wrinkles from the middle-out with an even amount of pressure and you should be looking good!}

Covering the stationary boxes took some strategizing, and I eventually decided on a 3-part cover for the outer box, and a 1-part cover for the drawer (not including the front panel, which was covered and added separately). The thing I had to consider was where the "seams" were going to show on the boxes. For the outer box: by covering the top and bottom separately, and the side boards as a single unit, I was able to ensure that the seams would be inside the box and therefore invisible, and that the lines that would show on the outside would be along the natural joint between the pieces--I used end papers inside the outer box to make sure the drawer would not snag the lining, and so it looked deliberate and nice for those who peeked inside. For the drawer: I used one large piece of (very carefully measured and cut) paper to wrap around from the bottom and up around the sides into the middle, with a rectangle cut to cover the base--the only seams were, once again, along the natural joints of the board.

For the front panel, I simply measured out a rectangle of book board that fully covered the front of the stationary box, cut a slit for (and threaded) the ribbon, covered the panel, and adhered it in place at the front of the drawer.

I recommend waiting to attach the top of the outer box to the whole until the very end--this allows for complete visibility and great maneuverability throughout the entire process--but each kind of box is going to be different and this tactic might be more or less helpful, depending.

Tada!


While I like how the drawer-pull stationary boxes turned out, they use a lot of book board and are therefore quite heavy, so I like the idea of leaning more towards lidded or clam/presentation boxes in the future.