

{The most effective way of cutting book board--short of an industrial cutter or a vice-grip-and-saw set-up--is by making 5 or 6 passes with a craft-knife, and using a metal ruler as a guide. You will want to do your cutting on a sturdy surface, as you typically end up using your body weight to keep the book board in place while cutting; you will want to use a sharp blade, even though it will probably dull in process; and you will want to cut on top of a cutting mat/board/already-highly-damaged-table-that-has-no-monetary-or-sentimental-value. I have been cutting on a mirror panel, but despite feeling a little Scarface (whether for better or worse) when embossing powder comes into play, it has been very unkind to my blades so I will be upgrading to a self-healing mat when I get the chance.}
Cutting out a piece of book board is highly arduous and frustrating, let alone 22 of them. Therefore, I really hope to live by my "New Project Resolution" and spread the process over several mornings/afternoons, and certainly not between only two shifts both dragging from 10pm-5am.
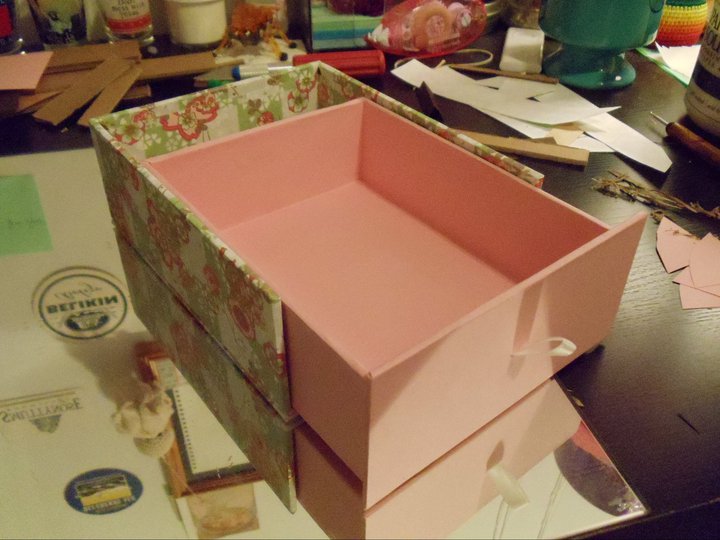
The stationary box was to have an outer box and an inside drawer, which could be opened by a ribbon pull. Here is the makings of the outer box (minus the lid, and already covered) and the inner drawer (minus the front panel), and a display of how one fits inside the other:


{Fixing book board together to make a box is really as simple as gluing it in place. I 100% recommend using PVA glue for all paper crafting (that involves the use of glue, rather that tape adhesives or stitching): it's a really versatile, quick-drying, and flexible glue that goes on easily, allows for a quick interval of last minute readjustment, and holds firmly. It's non-toxic and all that wonderful stuff.}
The idea is to bring the drawer measurements marginally past those of the box, so that when the front panel (which will include the ribbon pull) is in place, it will neatly cover the whole front of the box.
The issues I had right from the get-go were consistently with confused measurements; I was at the whim of my own design doodles scribbled onto scrap paper, and it was neither pretty nor time effective. Something in particular I had to tackle was the simple mistake of not anticipating the width of the book board within the box and drawer, and not factoring them into my specifications. Big "grr" moment, right there. I din't find this out until I put the first drawer together and discovered it was too small to fit the very note cards I had measured it for, but I was able to salvage the evenings work by cutting two new walls and tweaking their position on the base board.
From my mistakes, I have learned to round up in my estimations when working with book board and untested measurements, because it never hurts to have the wiggle room (when trying something new) and it is far easier to take away extra materials than try to add them.
{Covering a box, or book board in general is really simple: apply a roughly even layer of glue (coughPVAcough) and stick. If you're covering something to exact specifications, you'll want to measure everything out and be extra careful in your placement; but if you are covering something that will feature end papers (a smaller layer/page that is glued onto the in-progress side of the board as a way of finishing and cleaning it up) then a rough estimate and cut-out is perfectly adequate (as the evidence of the work will be hidden). As you adhere the paper/material to the board, smooth wrinkles from the middle-out with an even amount of pressure and you should be looking good!}
Covering the stationary boxes took some strategizing, and I eventually decided on a 3-part cover for the outer box, and a 1-part cover for the drawer (not including the front panel, which was covered and added separately). The thing I had to consider was where the "seams" were going to show on the boxes. For the outer box: by covering the top and bottom separately, and the side boards as a single unit, I was able to ensure that the seams would be inside the box and therefore invisible, and that the lines that would show on the outside would be along the natural joint between the pieces--I used end papers inside the outer box to make sure the drawer would not snag the lining, and so it looked deliberate and nice for those who peeked inside. For the drawer: I used one large piece of (very carefully measured and cut) paper to wrap around from the bottom and up around the sides into the middle, with a rectangle cut to cover the base--the only seams were, once again, along the natural joints of the board.
For the front panel, I simply measured out a rectangle of book board that fully covered the front of the stationary box, cut a slit for (and threaded) the ribbon, covered the panel, and adhered it in place at the front of the drawer.
I recommend waiting to attach the top of the outer box to the whole until the very end--this allows for complete visibility and great maneuverability throughout the entire process--but each kind of box is going to be different and this tactic might be more or less helpful, depending.
Tada!


While I like how the drawer-pull stationary boxes turned out, they use a lot of book board and are therefore quite heavy, so I like the idea of leaning more towards lidded or clam/presentation boxes in the future.
You made this without an instruction guide? Amazing! I bow to your box making powers.
ReplyDelete