Thursday, November 24, 2011

And Now For Something (Almost) Completely Pumpkin...

Right before I hop and skip over to Connecticut for the holiday, I leave you with my best wishes for a safe, delicious, and happy Thanksgiving (or, happy Thursday, to the Brits). And in the name of all things great and pumpkin (sorry Lionel, this is why he never showed...), I bring you further attempts at domesticity: Chocolate Chip Pumpkin Brownies.


Chocolate Chip Pumpkin Brownies

Yield: 24 small brownies
1/2 cup pumpkin puree
1 whole egg
2 egg whites
1 tbsp vegetable or canola oil
1 cup flour
1 tsp baking powder
1 tsp unsweetened cocoa powder
1/2 tsp ground cinnamon
1/2 tsp ground allspice
1/4 tsp ground nutmeg
1/4 tsp salt
2/3 cup brown sugar, packed
1/2 cup semisweet chocolate chips

Preheat oven to 350˚F.  Line an 11″- x 7″-inch pan with parchment paper.
In a large bowl, combine pumpkin puree, eggs and oil until smooth.  Set aside.
In a separate medium bowl, mix together the flour, baking powder, spices, salt and brown sugar.  Add to the wet ingredients and mix until thoroughly incorporated.  Stir in the chocolate chips.

Pour into prepared pan and spread evenly.  Bake for 15 – 20 minutes or until passes toothpick test.  Cool completely before cutting.

For lack of baking knowledge and a diverse supermarket, I accidentally bought pumpkin pie filling, but rolled with it, adjusting nutmeg and allspice quantities, and got something closer resembling chocolate chip pumpkin cakes, and only 12 of them, but they're still delicious (in a pinch)!

Serve with ice cream and disgusting amounts of incredible food.

Tuesday, November 22, 2011

STAMP: The Technical Musical Skill is Amazing, and Combines With Juggling, Dancing, and Leaping. . . or, is that Stomp?

'Tis the season for card-making, buying, selling, writing, sending, and receiving! I'm not sure which of the wise guys brought stationary (I imagine it wasn't quite mobster enough, so he went halfsies on the frankincense, and hung back to watch the car), or perhaps society is still paying tribute to the spirits of trees-passed, but lucky for this paper-nerd, cards have certainly moseyed their way up to becoming a top-notch wintry tradition.

While brainstorming for a holiday card order--to be of a "happy winter," and strictly secular persuasion--I rattled through my mental (and virtual) folders of classic crafts and got glossy-eyed over the joy and nostalgia of paper snowflakes. . . That is, until I spent an hour being reminded of why I stopped making them after the age of seven. Throughout the course of life, we find that there are a number of things that do not come naturally to us. Usually, if it involves paper and/or crafting, I can at least wing-it to a very passable degree. But man, I suck at making those fiddly little snowflake buggers! So after sacrificing said hour to my mounting frustration, I reminded myself of the (improvisational) skills that I am good at, whipped up a template and a series of paper-cuttings from some beautiful examples I found online, and turned that into my first experience with creating a hand-carved stamp. *Phew!*


I used a basic Speedball starter kit, despite the lower rubber quality, because it's incredibly forgiving and easy to cut (as soon as I touched the carving tool, I had flash-backs to slicing my hand up in 7th grade--that's year 8, for the Brits--while working on lino cuts, so I was enthused about avoiding a repeat). I just used my paper cut as a stencil, and traced the lines out directly with my exacto knife, marking the areas to be taken out by cutting an "X" on them (because I get all sorts of easily confused when it's passed 11 o' clock at night). After it was all marked up, it was really just a matter of patience and impending eye-strain, carefully scooping out the excess rubber--very satisfying, oddly enough.


When the stamp was done (and my brain was numb), I inked it up by bringing the ink pad to it, rather than the stamp to the pad. ColorBox uses pretty oily, and therefore slightly heavier ink, and gravity helps a lot in application. It pays to store the pads upside down, to keep the ink at the top (you get around a hundred more stamps out of them this way), and for the same reason, it's more effective to ink a large stamp in the same manner. Plus, you can better manage an equal distribution, not to mention actually see what you're doing. Because the rubber's not great on these, it does take a lot of ink, but if you "dab" an extra layer on top, it will stick to the paper much better. Next, I brought my paper to the stamp, just like the ink. This is mostly just so you can see what you're doing, but I think it helps a lot in weight/pressure distribution, and in not making a complete mess of my table/mat and inevitably my paper. Not that making a mess isn't fun (flour fight, anyone?).


Once again, because of the type of rubber (and because I didn't think ahead far enough to go buy a roller, which would have made everything go a lot quicker--psh, who has a hundred other things to do other than craft?? Nobody), the stamp typically delivered a "weathered" print, but vintage is IN, man . . .


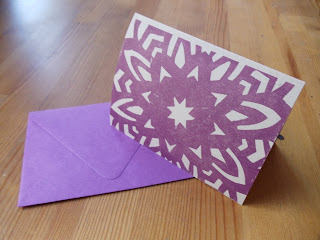
and, of course, you learn pretty quickly how much pressure is needed to transfer a more even print. So, ta da! Here is the result of my experiment with hand-stamping.


And here are the four colours I used, clockwise from the front: Robin's Egg (which turned out as a pretty, frost-like colour against the Paper Bag card), Scarlet, Moss, and Eggplant. Each card was then paired with a corresponding colour envelope.


And so a small blizzard of snowy cheer was created, "each its own individual expression of the beauty of winter" as I imagine Hallmark would say (in a terribly sweet voice. . . probably that of a child with an adorable speak impediment).

Happy Winter!

Tuesday, November 15, 2011

No Officer, I Swear, The Cards Have Been Drinking, Not Me

The weather's getting colder--and then warmer, colder, and back to 70 degrees again, apparently--and my delight for hot apple cider has been replaced with the challenge of making my way through a surplus of wine donations left over from the Fiesta.

While I was perusing my various craft haunts a while back, I stumbled upon a tutorial on kitchen colourants, and fell in love with the idea of painting with wine or tea (because I'm English, and coffee is "Icky"). As I had no project in mind, and no watercolour paper, it got pushed aside, but I kept it in the back of my mind for weeks. Then, while brainstorming unconventional cards for a few holiday orders last night, something (a pigeon in the dark, perhaps) brought shadow puppets into my mind, and with them, the idea of painting a shadow with wine.

With the prospect of a fierce, dark red stain, I immediately wanted to explore the logistics of painting a wolf. I spent some time researching how to make the shadow with your hands, and what the hands looks like, and from there decided how I wanted to place the two aspects in regard to each other. When I was happy with the size and shape of image I was going to use, I made it into a template--to be traced--so that each of the prints/cards would follow the same proportions.


One of the many things I aspire to have in my pipe dream of a studio space is a light box. As you can see, this stylishly improvised contraption is yes, usable, but not exactly what I would consider a replacement for the real thing: a flashlight and a clear acrylic display box that I--rescued? Salvaged?-- hoarded from a local Bath & Body Works remodeling a few years ago. It is decently effective with all the lights off, though, so I'll continue to save that spend for the future. You might also note that I did indeed upgrade from a mirror to a mat for cutting, so I am slowly moving up in the world.


With a "One for you, one for me; one for you, two for me . . ." kind of enthusiasm, I poured myself an extra glass of (classy) Charles Shaw Shiraz, and got to painting.

I also created a rough template for the shadow using the images I had found while researching, and some thicker card and played around with several weights and textures of paper before really starting. The smooth card-stock had all kinds of issues absorbing the liquid and came out worse-for-ware, so I'd definitely recommend using a textured (white) stock, no lighter than the weight of a greeting card.

Retrospectively, a template made out of something waterproof, like plastic, may have worked better, but I didn't find that I was using a wet enough brush to cause any excess wine to seep from the card onto the surface of the card-stock. Just something to keep an eye on.


Overall, this project was amazing. Everything went as smoothly as I could have imagined, it was delicious, and in one evening I created some of the best work I've done, from start to finish. Try it out, really. Or, better yet, shoot me an email and buy some! I'm going to do them in small runs, I think; each featuring it's series number (i.e. 1 of  8) and specific wine on the back.

When I stop jumping for joy, I'll take and upload a better product shot, but you certainly get the idea of how the experiment went.

Thursday, November 10, 2011

Fiesta de Los Muertos: Crafting A Party

The verdict is in, and my Day Of The Dead party was a hit! I can't say I'm much of a "party planner," given that my coordination skills didn't need to extend much passed my ability to pick a date and excitedly rave on for a month, to anyone and everyone (cue marketing training) about my grand plans. Once these administrative tid-bits were taken care of, however, it was simply down to shaking an intimidating fist at a pile of materials, and ordering them to "Shape up!" And wouldn't you know, this is how it went. . .


To Kill For: Food & Drink 

1. The pizza said "Boo," not the people eating it

Pizza so scary that it turned the mozzarella white! Ghost pizza is--let's face it--adorable, and so easy to make.


You can make it as complex and flavourful as you like, or, if you're a little stretched for time (like this kid, right here), you can buy wonderful pre-made dough at Trader Joes, use a thick marinara sauce for a base, and simply "slice and dice" your mozzarella into ghosts. A ghost cookie-cutter, along with pre-sliced cheese, would have made things a whole lot prettier, but what's life without trials and hardships, really.

**Tip: bake the dough for a couple minutes before adding sauce and toppings, and you'll avoid a gooey center.

2. Sick, dude! No really, sick

There's nothing quite like a puking pumpkin to make you want to devour guacamole. At first glance: "eew!" At first bite: "oooh!" And second, third, fourth, and so-on.


My little sugar pumpkin carved easily, kept the guacamole moist, and successfully had people cracking-up and chowing-down all night. Way to go, little dude.

3. After puking, it was clear the pumpkin was toasted . . .

Life lesson: don't get so wasted that you don't notice when someone scoops your brains out! Toasted pumpkin seeds made for a great snack food amid the various chips and dips, with a bit of a heavier, popcorn appeal. I felt like the occasion gave me cause to experiment, so I made paprika and sea salt seeds. Still simple, but the paprika proved to add a wonderful zing. Next time I want to try rosemary spiced pumpkin seeds.

4. d) All of the above

Pudding cups, candy corn, salsa and chips, caramel apples, and chocolate chip raspberries--man, we had it all!

5. "Gourmet Jell-O Shots" are ironic, and yet delicious

When I saw that you could make Jell-O fruit slices, I immediately scrapped the child-friendly concept and started thinking about which alcohol combination would work well with a Jell-O-sweet mixer, and fresh fruit. My first thought was tequila, as it is already associated with limes, followed by brandy, as it's inoffensive taste would blend well with sugar (retrospective thought process: fiery Christmas pudding). After a some internet research and a little smell-testing, I settled on the following: Kah tequila with strawberry margarita mix, set in lime Jell-O, and served in shucked-out lime quarters with lime pulp and a liberal sprinkling of sea salt; Cointreau Liquor and Christian Brothers' Brandy, set in strawberry Jell-O mix, and served in shucked-out orange slices with orange pulp (I'd have used blood oranges, but couldn't get them).


The Jell-O shot recipe consists of 1 cup alcohol, 1 cup boiling water, and 1 packet of Jell-O mix (with the exception of the tequila, which replaced the water with 1 cup boiling margarita mix). I shucked the fruit using a paring knife to cut halves, and then separate the fruit from the rind, then used some sweet jack-o-lantern skills to scrape it all out with a spoon--do this step over a bowl so you can save all of the delicious juice and pulp. I used a cupcake pan to hold my rinds while the Jell-O set, which worked fabulously, and then, once fully cooled, they slice easily and hold their shape! The tequila slices were good but STRONG, so I might tweak that ratio in the future (or buy better mix), and the Cointreau/Brandy were to die for . . . pun fully intended.


I wanted to serve all of the Cointreau/Brandy shots in syringes, but it was unexpectedly difficult to buy a box of the the plastic bodies on short notice (perhaps this isn't such a bad thing), and the pharmacy would only humor me with one. I think the single "bloody" martini glass got the point across well enough, though.

6. Frigid hands make for dirty jokes (further irony)

My ever-creative partner in craft for the party was going to be contributing a batch of sangria, so it made "solid" sense to chill some ghost hands to keep it cool, and creepy. You just take a latex glove (wash inside and out, thoroughly), fill it with water, and tie off the wrist with a rubber band. Once it's frozen, you simply cut and peel the glove off--be careful not to break off any fingers, or cut your own--and place the ice in the bowl with your drink.


You could also freeze various mixers (lemonade, Coke, etc), to introduce an accent flavour to your punch/jungle-juice. I used a little bit too much liquid, so my hands came out a big chubby, but that clearly just lead to further innuendo.

**Added bonus: we added the left-over orange and lime pulp to the sangria, and yes, it was as amazing as it sounds.

7. Custom drink labels don't make cheap beer taste better, but you're smiling too much to grimace

Having spent considerably too much on booze already, I decided to "dress up" some Rolling Rock to better suit the occasion. One punny name and a Google image-search later, and "Rolling Heads Beer" was born.


I used InDesign, because I'm obsessed with it and insist on doing things the long way, but you can easily whip these up using any kind of word processor label temple. I find that 4" x 3 1/3" labels work the best.

**Added bonus: I filled an empty wine bottle with red and blue (that makes purple, kids) food colouring and water, to mimic red wine, and left it out on the bar in the hopes that someone would drink it and get confused, but to no avail. Bested by my own delicious distractions!


To Die For: Decoration

1. Some go ape-shit, I go bat-shit (does that mean I say people are acting guano?)

I love origami. So when I stumbled across an instructional video on how to fold bats, I became even more obsessed with this glorious excuse to craft that I like to call my "party."


I worked with three different sizes of paper (the cell phone is for scale), and made around 20 in total. The first few took longer, given the obvious learning curve, but once I got the hang of it, I was cranking out each new bat about every 3 minutes--and now, 20 bats later, I may never forget how. Once they were all constructed, my lovely (and tall) roommate hung them with different lengths of white string all down the hallway! Na na na na na na na na bat cave!


The chandelier was turned off during the party, but we had lights strung along the floor, which cast their shadows up around the ceiling.

**Added bonus: these bats come out single-sided, but if you use a paper with some kind of design on the back (I actually just used my discarded calendar pages, so it had a grid and colourful lettering on one side) then you get an extra bit of decoration when the spin.

2. Some pumpkins were harmed in the making of this good time . . .

While there were many things at the party that got new people meeting and greeting, the trump of the night goes to pumpkin bowling.


6 toilet-paper-roll pins, 1 long hallway, 1 shockingly round sugar pumpkin with little to no stem (and a catcher, we learned, to help keep the pumpkin round, and not in pieces against the wall). I clearly had a good time assigning various expressions of fear or malice to the pins, and was equally satisfied by sending them flying across the apartment.


You can just imagine them shaking as the people gather, the excitement mounts, and the pumpkin approaches--POW! We pulled out the pins about half way through the night, giving everyone enough time to settle in (i.e. consume the aforementioned libations) and went, tournament style, for over an hour. Thirty or so people make a really good cheering squad.

3. Scream it like you see it

Decorating the bowling lane, and the various rooms of the party, were an assortment of critters:

from Bunnicula,

to the bookcase monster.

Hell, even Martha Stewart came up for a visit and brought Fievel back East.

And if the beasts don't bite, the walls were still a fright:


Eighteen fears, printed on parchment paper, to remind you of your every standing hair (see Pentheraphobia, n. fear of one's mother-in-law). Not afraid of vegetables? You're a braver man than I.

In a blur of purple, we had glow sticks kicking around inside balloons, black lights, and lantern jars:

 just crack a glow stick, cut it open, pour the contents into a small jar, and shake.

**Warning: Judging by smell, the contents of a glow stick is about as close to over-the-counter nuclear waste as you can get (one would hope, anyway), so please designate some jars that will ONLY be used for lanterns. Seriously, do not try to reuse them for anything that could be applied to sky or ingested, no matter how well you clean them. Despite gaining entertaining powers, superheros were still damaged beyond human repair by whatever the hell they got themselves into, and probably died from intense bouts of cancer. Not really worth the risk. Other than that, just try not to get the liquid on your hands when cutting the tubes (wash thoroughly if you do, even if you think it's cool to see your skin glow), and you should be right as non-acidic rain.

4. "Closing time" by Semisonic, played at the end of the night, makes my skin crawl more than vegetables do

It makes me feel warm and fuzzy (much like the hot rum apple cider that was gone before I could get it on this page) for you to have shared in my craft-spolsion, either in person or in support and readership. So hit the lights, dance to some electro-swing, and eat your heart out.

Party on, Garth.

Friday, November 4, 2011

Charles Avery Ingle, In Loving Memory

A year ago, today, a good friend of mine--and a good friend to many others--took his own life. One week before his third-year wedding anniversary; two weeks before his 23rd birthday; six weeks after he returned from Iraq. Whether it feels like it's been more or less than a year, it's too long to have been without him.


My perfect prom date: he waited with me all night while I puked my guts up from--what recurring bad luck would go on to dub--an "allergy to formal wear," AKA poorly timed gastroenteritis (my best friend was equally sympathetic while I heaved behind her in my bridesmaid's dress, en route to her "I do's," because I'm lucky enough to have terribly patient and understanding friends haha).

Charlie never saw the start of Warren Tales, but he would have been Warren's personal cheerleader--like Powder Puff all over again: high energy, elaborate bravado, and a dash of cross-dressing for effect. It is my firm belief that within a few weeks he would have either produced a flag to wave, or a hat to parade, in enthusiastic support. He gave everything he had to everyone he met, and we loved him dearly, in return. And so, I commemorate him in paper, in loving memory.


 Watercolor and pencil on paper doily.

Wednesday, November 2, 2011

Beatrix Potter: A Warren Tales Adventure In Ceramics

Since September, I have been happily participating in a community pottery class, for beginners. This is my first foray into the ceramic arts, and I have found it aptly challenging and exhilarating.

The fact that this is really only my first time working with clay (with the exception of my preschool masterpiece that continues to parade it's elegantly subjective "mouse" shape on my parents' mantle) surprised me, considering my love for all things that involve using my hands and making a mess. When I took a moment to think back to art opportunities offered at my high school, however, I blurrily recalled a 6:30am "E-Period" schedule. . . . And so, art was defeated by the only thing I love more: sleep. Alas (and alack).

When I first stepped into class (after shrinking into the wall with my uncharacteristic, and yet usual "first day" jitters), I thought we were going to be making pinch pots for the first month, while we aligned our subliminal Mr. Miyagi training. But after no more than about 5 minutes of clay-doodling (see above for my spiral cone, AKA bee hive/snail shell amalgamation), our delightfully lackadaisical teacher--who much more accurately embodies Tony Hale, circa his guest-bit character on an episode of Community, as Jeff's pottery instructor (S01E19)--sent us to the mercy of the ever-judgmental wheel! He quickly taught us how to correctly knead our globs of clay in order to follow the counter-clockwise rotation of the equipment, and then it was me versus the machine. . .

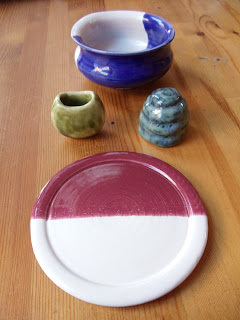
I threw; it spun. I pushed; it--did very little at first, as I'm lacking in upper-body strength these days, but eventually--formed. I spoke to it in pretentious cliches that alluded to dancing; it told me to quit rambling and get to the point. And so I created a serving dish and a plate, each around 6 or 7 inches in diameter (trimming and glazing were done in later classes, obviously):


Naturally, after I left my first class--on top of the world from having bested the wheel--I proceeded to tell as many people as seemingly possible that I was an unstoppable force of prodigal ceramic talent, and that they should put their orders in now before I'm swamped with admiration and business.

Naturally, that over-sized, head-shaped bubble quickly deflated with my unstoppable perfectionism and frustration, and recurring pencil-pot-shaped creations.

It looks like I'm not the next [insert Mozart of ceramics here]: I'm easily bored/distracted amid all the spinning; have yet to plan ahead and design what I want to make before I get behind the wheel (don't think and drive, kids); trimming is the nemesis of my anal retentiveness; and I'm a lazy glazer. However, I have picked it up quickly and successfully, and I'm having a helluva good time with both the clay work and with my classmates; so it looks like I'll have to settle for being "that kid" in class, who does things well without necessarily trying (see again, aforementioned episode of Community).

And while you roll your eyes, groaning that I am indeed "that kid," you can take a gander at my slowly growing body of work:


Note: No Ghost moments were reenacted during the making of these products.

Stay tuned for another Warren Tales experiment: Adventures In Film: Sleeping Through Photography Class.