It's fair to say that a lot of my crafty experiments come from--and could probably do to stay in--the bodily portion kept 'round the back of my trousers. . . but how I blunder on with enthusiasm! What I continue to neglect in foresight, I seem to make up for in dumb--improvisational--luck.
Sealing wax is something I've had my proverbial (and physical) eye on for some time now. The problem: it's grossly overpriced; and it's hard to find, unless you count the (not) cheap, glue-gun imitation. Which I do not. I happily embrace tape and glue products for the chemically enhanced, hoof-meltingly genius inventions that they are (on clear nights you can faintly hear the phantom moos of an underground cattle trail heading from Elmer's Ohio out to happy California. . .), but I sincerely wish it wasn't such an alien concept to create materials from scratch, and indeed sell such wonderfully crafted materials. Be the change you want to see, right?
I did some online research and settled on the following recipe:
After cross-referencing some of the other recipes to verify the contemporary materials needed, and some awkward phone-calls ("Hi, I'm looking for the following antiquated ingredients that I know painfully little about. Yes, I'll hold while you try to figure out what I'm smoking, and pass me off on each of your coworkers, sequentially."--I genuinely was being useless, and was happy to piece together information from everyone), I was set! All the smelly powders, clumps, and liquids I'd need for two batches of sealing wax.
Step 1: [Don't] Burn Baby, Burn
I cut up and melted my GI-GAN-TO 1 pound slab of raw beeswax using a pair of scissors (there has got to be a better way. . . ), and a (Jerry-rigged, of course) double broiler set-up to avoid burning my materials. This bowl was full by the time the wax was all in there (cutting the wax into shavings or small pieces is best for quick melting, but the blisters on my hand after an hour of doing so certainly feel otherwise). Then you pour the other ingredients in, and stir until the giant ball-o'-tar (AKA rosin) fully integrates into the liquid.
Step 2: Stick 'em Up!
When it came to molding my wax into sticks, it would have done me a lot of good to use that ever-elusive foresight. I read somewhere (while researching, at least) that to cool the wax you pour it on a pane of glass/marble, and then roll it into sticks. . . craftsmen in the days of yore may have been cool enough to do this (no pun intended), but I apparently am not (clearly, what with the constant punning). We're talking an epic fail. I was envisioning wax like globs of ice cream on the cold slabs at Cold Stone, melding and folding into the extra toppings; but what I created was simultaneously sticky and crumbly, and not going out that easy. Whether mine was how it's supposed to be, I couldn't say, being a ye olde noob. My guess is not.
So I improvised!
First up: Ice cube tray. I wanted to make cleanly molded sticks, and I just so happen to have a water bottle tray, with sticks instead of cubes, so I poured it in using a film canister and a pair of pliers as a ladle. . . seriously (worked surprisingly well, actually).
Second: Cooling rack and tin foil. As I only had one ice cube tray, I came up with the bright spark of an idea to make little wax troughs using tin foil in the space between a cooling rack grate. It wasn't pretty, but it did work pretty well (you have to pull the ends of the foil up to make a little barrier, but tin foil is fickle, and some messy spills occurred). When the wax was cooled, I just lifted and pulled the foil to get the sticks out. Easy.
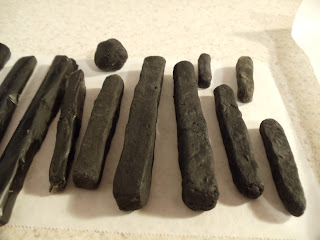
The few measly sticks molded by hand.
The Tin Man, wishing he had a real mold.
And the far more successful, and impressive, tray sticks. They're a little longer and thicker than I would necessarily want, but if you're not burning your hand when holding them, then what does it matter.
From the delicious sight (and tar-lific smell) of my melting bowl, it's pretty obvious that I was unable to adequately wash it for consumptive use again. Luckily (or is that improvisationally), I used an ex-roommate-inherited bowl that I disliked and had many of, so it wasn't much of a loss. Having no irrationally negative feelings toward the spoon however, that casualty was marginally sadder. Basically, you want to use a bowl that won't crack from the heat, nor will you care if it does. Also, have windows open while working, because the fumes are a little intense, and it took me 2 full-length CDs and 1 screening of Atonement (seemed appropriate) to square everything away. So, lots of inhalation.
Step 3: Write a Letter
Do it, it feels articulate and generally awesome. This is a photo of something resembling my heart poured out.
Step 4: Signed, Sealed, and (hopefully) Delivered
Whip up an envelope (I use a template, to my my life easier), hold a cooking lighter under your wax stick (it'll be on for an extended period, and you don't want to burn your finger, like with a basic disposable), drip somewhere between a nickle and a quarter-sized pool (that's 20p to 2p-sized for the Brits) onto the close, depending on the size of your seal stamp, and press! My stamp is bizarrely big, and this was my first attempt, so it's a little shoddy, but I'm getting better as I figure out the ratio.Aaaaand. . . Go!


Love everything about this post, up to and including the photos and the inventive/indomitable spirit that inspired it. Huzzah, Warren. Well done, sir.
ReplyDeletethanks for this post very informative.
ReplyDelete