Saturday, April 7, 2012

Signed, Sealed, Delivered

Back in the Fall, while taking a beginner's ceramics class, I made the acquaintance of a truly kind and whimsical older gentleman, Michael, and it wasn't long before our enjoyment of each others' company grew to a friendship outside of the classroom, also. Now, it's been five months since the class concluded, and we still make a point to get together every few weeks--when our schedules allow it--to catch up on good conversation, and eat good food.

An artist in a business man's shoes, and a mind like a Rolodex, bursting with people and experiences, I could listen to his stories for hours. And so I do! (He's been known to sit through a fair amount of my steady ramblings, too, so you know he's got to be awesome haha) In getting to know this amazing individual--40 odd years my senior, and yet to whom I am fascinatingly alike--I have learned so much about myself, and how I want to approach the world.

Michael was a fast fan, and continues to be an avid supporter of Warren Tales. And, the more I heard about his work as a metal-smith and natural material mender (not sure if that makes grammatical sense, but it has a great sound so I'm invoking the jurisdiction of my poetic license!), the more interested I became to see him in action. I had asked him a few months previous if it would be possible for me to commission a new "WT" wax seal for purchase (he was a school-boy of excitement at the idea of wielding a signet ring--more poetating), and although he struggled with logistics, he (secretly) enlisted one of his many stunningly talented friends to help him pull something together. So concludes that at our latest meet-up, he presented me with this gift . . .


The level of detail cast in brass profoundly astounds me--from Warren's bowler hat band, to his tufted tail, and down to the grooved wood grain of his cane.


The brazen beauty in homemade-sealing-waxed action.


And this, here, is the fabulous result of my joy overload.

Sealing tip: place your seal in the freezer for 10 or so minutes before you start, and use a tissue to rub some olive oil over the stamp face to further prevent any sticking. Works like a whole genteel-sized load of charm.


I cannot possibly (thank you) say thank you enough but (thank you) by the time I (thank you) finish this (thank you) thank you, it's possible that I (thank you) would (thank you) have given it a (thank you) decent (thank you) attempt.

And through all of this dumbfounded joy and overflowing gratitude, I can't help but also thank Izak Lazarowski, once again, for giving Warren Tales the undoubtedly dapper face we know and love.

Thank you. Thank you, and goodnight.

Monday, March 19, 2012

All For Books, And Picture Books For All


There once was a mail-sending snail
who told me a rip-roaring tale
of love at first glance
and a stamp with a chance
to deliver this thought without fail.


Everyone loves picture books because they warm the cockles of our hearts. Granted, I'm not entirely sure what cute animals and poetry have to do with a kiln (see origin of the phrase), but by Jove (another funny one), we like 'em!

When I'm not cackling manically over a wizened typewriter and piles of kraft paper late into the night, I have the absolute pleasure of earning my primary income at the adorable hands of these fuzzy-fingered follows--I work in Children's publishing.

As part of my job, I receive printer proofs of upcoming titles, which then get recycled once the book is bound and released. But every now and then I stumble upon artwork that is simply too cute to send the way of the Pulp-Masher-3000, so I remake the pages into something new:

Postcards, Envelopes, and Liners (not pictured), Oh My!


Board Book Postcards (thick cardstock)


Picture Book Envelopes (cut using a Paper-Source envelope template)

I have always been a fan of reusing book elements in my work--for invitations, notebooks, or just about anything I can my hands into, really--and so it's nice to incorporate pages into casual correspondence, also. There are so many things you can do with the materials you find (I can't say I've ever had to purchase my aforementioned kraft paper), and when you keep an eye out, you start seeing the framework of and inspiration for new projects everywhere! Upcycling makes for some very easy, very interesting correspondence, and costs next-to-nothing. . . even if it does turn you into a bit of a hoarder (cue toppling paper-tower of doom).

I'm looking forward to giving a few kid-enthusiasts (AKA still kids at heart) a nice "Happy You" present with these sets, myself. 

And to learn more about great picture books NOT worth cutting up, check out fabulous reviews and commentary at Jackets And Sleeves in the "fight against fluff."

Monday, March 12, 2012

More Than Just an Inkling...

I've taken you down the proverbial rabbit hole to the making of sealing wax, but what's a letter if it's not written in your own ink?? (Other than a wonderful thing that you should still most certainly send--hell, write in crayon, or in a series of Pictionary drawings, as long as you write!)

To make your own, very easy and simple Rosemary Ink, follow these directions:

1. Use enough herbs to cover the bottom of your pan.
2. Add enough water to cover the tops of the herbs.
3. Bring to a boil and let simmer until the water has reduced to a generous tablespoon.
4. Strain and you’re left with a pretty light brown ink.


It takes a while to boil the water down to the last "generous tablespoon," but it smells SO good while you wait. I recommend a spontaneous kitchen dance party to pass the time.


Once you've exhausted all of your best dance moves, pour the remaining liquid into a bowl, and press the boiled herbs through a strainer (to make sure you get as much out as possible). By the end, your rosemary should be nice and pulverized, and presto! Your very own, home grown (whether rhetorical or literal) ink!

Try to use a container that is small and secure (something from the no-splash-zone to avoid spills), like a baby food jar. I improvised (there's that word again) with an old jar of caramel dipping sauce that I cleaned out and re-purposed, and it worked wonderfully well. Your batch will only produce a small amount of ink, but it goes a seriously long way; and a small pot will minimize the air exposure between uses.


You can write many-a-letter in a whirlwind of excitement, or save it for a rainy, and snail-happy day. Given that the ink is made up of rosemary, I have noticed that it's somewhat perishable, so this ink will need to be used up in a timely fashion--and refrigerating the concoction would probably help. I'd estimate a few weeks per batch.

Happy mail, my darling snails!

Wednesday, March 7, 2012

Sealed With A Ki--ckass Seal!

It's fair to say that a lot of my crafty experiments come from--and could probably do to stay in--the bodily portion kept 'round the back of my trousers. . . but how I blunder on with enthusiasm! What I continue to neglect in foresight, I seem to make up for in dumb--improvisational--luck.


Sealing wax is something I've had my proverbial (and physical) eye on for some time now. The problem: it's grossly overpriced; and it's hard to find, unless you count the (not) cheap, glue-gun imitation. Which I do not. I happily embrace tape and glue products for the chemically enhanced, hoof-meltingly genius inventions that they are (on clear nights you can faintly hear the phantom moos of an underground cattle trail heading from Elmer's Ohio out to happy California. . .), but I sincerely wish it wasn't such an alien concept to create materials from scratch, and indeed sell such wonderfully crafted materials. Be the change you want to see, right?

I did some online research and settled on the following recipe:


From the Encyclopaedia Britannica (first ed./1771) under "Wax": "Sealing wax is made in the following manner: Take one pound of bees-wax; three ounces of fine turpentine; olive-oil, and rosin, finely powdered, of each one ounce: when they are well melted, and the dross taken off, put in an ounce and a half of vermillion, or red lead, finely ground, and stir them together till they are well incorporated: and when this mixture grows a little cool, roll it into sticks, or in any other form. If you would have it black, instead of vermillion, or red-lead, put in lampblack."

After cross-referencing some of the other recipes to verify the contemporary materials needed, and some awkward phone-calls ("Hi, I'm looking for the following antiquated ingredients that I know painfully little about. Yes, I'll hold while you try to figure out what I'm smoking, and pass me off on each of your coworkers, sequentially."--I genuinely was being useless, and was happy to piece together information from everyone), I was set! All the smelly powders, clumps, and liquids I'd need for two batches of sealing wax.


Step 1: [Don't] Burn Baby, Burn
I cut up and melted my GI-GAN-TO 1 pound slab of raw beeswax using a pair of scissors (there has got to be a better way. . . ), and a (Jerry-rigged, of course) double broiler set-up to avoid burning my materials. This bowl was full by the time the wax was all in there (cutting the wax into shavings or small pieces is best for quick melting, but the blisters on my hand after an hour of doing so certainly feel otherwise). Then you pour the other ingredients in, and stir until the giant ball-o'-tar (AKA rosin) fully integrates into the liquid.


Step 2: Stick 'em Up!
When it came to molding my wax into sticks, it would have done me a lot of good to use that ever-elusive foresight. I read somewhere (while researching, at least) that to cool the wax you pour it on a pane of glass/marble, and then roll it into sticks. . . craftsmen in the days of yore may have been cool enough to do this (no pun intended), but I apparently am not (clearly, what with the constant punning). We're talking an epic fail. I was envisioning wax like globs of ice cream on the cold slabs at Cold Stone, melding and folding into the extra toppings; but what I created was simultaneously sticky and crumbly, and not going out that easy. Whether mine was how it's supposed to be, I couldn't say, being a ye olde noob. My guess is not.

So I improvised!


First up: Ice cube tray. I wanted to make cleanly molded sticks, and I just so happen to have a water bottle tray, with sticks instead of cubes, so I poured it in using a film canister and a pair of pliers as a ladle. . . seriously (worked surprisingly well, actually).


Second: Cooling rack and tin foil. As I only had one ice cube tray, I came up with the bright spark of an idea to make little wax troughs using tin foil in the space between a cooling rack grate. It wasn't pretty, but it did work pretty well (you have to pull the ends of the foil up to make a little barrier, but tin foil is fickle, and some messy spills occurred). When the wax was cooled, I just lifted and pulled the foil to get the sticks out. Easy.


The few measly sticks molded by hand.


The Tin Man, wishing he had a real mold.


And the far more successful, and impressive, tray sticks. They're a little longer and thicker than I would necessarily want, but if you're not burning your hand when holding them, then what does it matter.

From the delicious sight (and tar-lific smell) of my melting bowl, it's pretty obvious that I was unable to adequately wash it for consumptive use again. Luckily (or is that improvisationally), I used an ex-roommate-inherited bowl that I disliked and had many of, so it wasn't much of a loss. Having no irrationally negative feelings toward the spoon however, that casualty was marginally sadder. Basically, you want to use a bowl that won't crack from the heat, nor will you care if it does. Also, have windows open while working, because the fumes are a little intense, and it took me 2 full-length CDs and 1 screening of Atonement (seemed appropriate) to square everything away. So, lots of inhalation.

Step 3: Write a Letter
Do it, it feels articulate and generally awesome. This is a photo of something resembling my heart poured out.


Step 4: Signed, Sealed, and (hopefully) Delivered
Whip up an envelope (I use a template, to my my life easier), hold a cooking lighter under your wax stick (it'll be on for an extended period, and you don't want to burn your finger, like with a basic disposable), drip somewhere between a nickle and a quarter-sized pool (that's 20p to 2p-sized for the Brits) onto the close, depending on the size of your seal stamp, and press! My stamp is bizarrely big, and this was my first attempt, so it's a little shoddy, but I'm getting better as I figure out the ratio.


Aaaaand. . . Go!

Wednesday, February 22, 2012

Sky's the Limit for a Baby-to-Be

Spring is approaching, and with it, adorably big-eyed and chubby-cheeked babies, and the baby shower invitations they rode in on.

Since my success in painting with wine (not to mention the sheer fun of My Dunk Valentine), I've been branching out from the consumable and experimenting more with actual paint-based watercolours. I have also been spending more time taking on digital print orders, which have been a lot of fun (InDesign and Google Analytics will have to battle it out for my heart). Put them together and what do you get? Bibbidi-bobbidi-beautiful digital watercolour flat cards. Now all I need are jolly blue robes to wear so I don't look silly while I saunter around the "shop". . . 

To get that image out of your head, take a gander at the finished products, below! 

Little Mr.


Watercolour base pages: The sky may have been done with paint, but old habits die hard, and I couldn't get enough of the naturally antiquated colour of tea, so I went pinkies up for the banner. The next step was to scan these pages in and pull them together digitally. Then, I could set the type to follow the curve of the banner, and by inserting negative space, I used the lack of colour to bring out the textured paper and make clouds (see below).


 Next came the army of hand-cut, antiquated paper planes: For consistency, I got the image the way I wanted it, mirrored it (so that the printed line would be on the back of the paper and still face the direction I needed), and then printed a sheet of them onto red card stock. I also did myself a favour and bought a new pack of blades, and replaced them each time the very tip broke off--which, for the record, happened about every seven planes. Using a clean edge really made all the difference in the quality of the cut, and the quality of my sanity by the end of it.


I brought it all together by attaching the little prop plane to the invitation with a mounting square, so that it would be raised up from the paper, and sewed a link of embroidery thread (also in the running as my one-true-love. . . now that I think about it, my heart seems to be a little slutty) between the end of the banner and the plane, to give it some texture and an movement. Lastly, I whipped up some custom return address labels, featuring "A Special Delivery From" in the official USPS font, and the same little red plane to tie the envelope and the invitation together. As a bonus, I threw in some vintage air mail stickers that I pulled together from some images online.


One of my favourite parts of finishing a custom order is being able to wrap each bundle up with a personalized band, featuring the names of the recipients. For these announcements I decided to showcase the first names of the parents-to-be on either side of their baby-to-be's.

Little Miss


Watercolour base pages: Painting an elephant becomes all the more difficult when you first have to teach yourself how to draw one, but I was really pleased with how the little stuffed-animal-esque illustration came out. Then, just like before, I scanned the pages in and pulled them together digitally.


For something a little extra, and to make use of the freedom that digital allowed me, I curved the text to fit the curve of the balloon.


 And once again, before no time at all, the invitations were printed, cut, and I'd reached my favourite part, and this time with the baby-to-be's full name.

Thursday, February 9, 2012

My Drunk Valentine

For Valentine's day, Warren Tales is bringing you a D.I.Y. tutorial on how to make three alcohol-based greeting cards. Rather than a succinct and cleverly edited video--and thanks to my own computer illiteracy (potentially encouraged, in part, by the fact that I spent all day drinking)--however, I humbly offer you two jovially written reports, and the only portion of a day's filming that has any functioning audio or general usability. And so, without further ado, I hope you enjoy this 35 minutes of delightful and bewildering banter as you, too, tipsily paint and craft your way to being My Drunk Valentine.

Número Uno: Tequila y Amor (Possibly More of One Than the Other)

The first card of the occasion was executed as a postcard, painted with an 1800 Tequila and Pomegranate & Lime juice combo. The Pomegranate & Lime juice, being mostly pear juice, however (funny what you discover when you read the ingredients of food products), lead it to paint on far too light, so I had to get my food colouring on. But a solid serving of what was probably more than a healthy dose of red dye later, and I was sitting pretty.


First, I drew a grid of hearts in pencil, leaving two squares blank near the bottom in favour of two trusty letters, "I" and "U". Next, I burst out of my kindergarten-trained box and painted outside of lines. Felt good. Admittedly, so did the cocktail. Finally, as I wrapped up my first card, I added some pizazz by going back over my pencil lines with a red LePen and a gold gel pen, as per the image below.


In retrospect, rather than breaking out of kindergarten, it would appear that I momentarily returned to it. Good times.

Nummer Zwei: Weihenstephaner Hefeweissbier Dark (Easier to Drink Than Say)

If I was born in the United States, it's possible that this video would eliminate my possibility of running for political office... Enjoy!


My Drunk Valentine from Warren Tales on Vimeo.


Opa, Cheers, and Wa Hey!

Numéro trois: Cabernet Sauvignon (This Wine Can Speak About as Much French as I Can)

My third, and last, card was the one I was actually looking forward to making the most (plus, I was in a curiously good mood at this point, and just happy to be raising another glass, hmm). For this card, I got to return to one of my favourite new tricks: wine watercolours.


I used a pencil and a stencil (and made further rhymes by investigating some tinsel) to faintly trace out an ampersand in the middle of my card, and painted the heart from the wine in my glass over the outline. Once the wine had dried, several people braced themselves and I proceeded to cut out the positive pieces of my design with a craft knife. Et voila!


So, somehow, over a day of increased alcoholic consumption (A.K.A. "Gettin' Krunk"), I managed to produce the best product last. Riddle me that.

***

And there you have it: three cards that you yourself can make, in sickness and in health, in good times and in bad, and in joy as well as in sorrow...to celebrate (and entertain) the people in your life.

I'd like to extend a big thank you to my roommate, Jack, for letting me borrow his computer after mine gracelessly ceased to fulfill it's primary function as my robot slave; the friendly man at the liquor store, for recommending a delicious beer (the very one you witnessed); the ever-intoxicated--but well fed--Hannah Hart, of My Drunk Kitchen, for inspiring the madness (I should send her a card); and all those who encouraged me to get drunk and publicly post it to the world wide web--so many! How curious...

Party on, Warren.

Sunday, January 29, 2012

Post Holiday Wrap-Up

The problem with having loving and supporting friends and family, is that you can't talk about what you're working on until after the holiday season is over! I know, tough break, right? Geez.

And so, well after Christmas and the wintry sort are behind us, and now that Boston weather is bringing us bizarrely toward an early spring, I give you a look into my season, and how a variety of projects worked out:

Detachable [Post]Cards

This is the first year in a long time that I've sent out holiday cards, and ones that I made myself, at that. I had been playing around with a detachable postcard idea for a long time, but hadn't been able to settle on a design. So, building off the hand-carved paper-snowflake card idea that I had created for a client the month previous, I got to realize that concept.


The first thing I wanted to do was add some embossing to the original stamping method. As I was using pigment ink pads--rather than oil-based printing ink--to stamp my design, I was concerned for the durability of the stamp, and its potential for the ink to transfer when in contact with other paper (a particular issue given that the front half of this card was going to have to go through the jungle of mail sorting twice: once in an envelope, yes, but then again on its own as a postcard). Embossing the stamp would take away something that seemed "natural" about the weathering that automatically occurred with the Speedball rubber, but would preserve it as an intended design element. Et voila, happy compromise (with a pinch of life-lesson).


My perforating tool is one of my absolute favourite gadgets and never fails to make me irrationally giddy (giddy effect may vary depending on the potency of one's inner dork). It's easy and effective, is incredibly lightweight and small, runs at only around $3, and can be used for all sorts of fun projects other than just cheesy coupon books. You will be subjected to further gushing and proclamations of perforated love in future projects. To the point: I used the perforator and a ruler to run a line along the top of the designed half of the card; then, to detach, the recipient simply folds along the line and tears apart.


On the inside of each card, I included a postcard stamp, so that it was ready to send when the recipient was done enjoying their greeting, and wanted to pass a greeting of their own along to someone else.


Above are examples of the four colours I chose to use (from front to back: Moss, Harbor, Scarlet, and Eggplant), which all paired with corresponding envelopes.


Each envelope was addressed with a fun "Support Snails Send Mail" address label, and included a snail mail insert which read, "I hope you will enjoy this card and send the thought along, in support of the Unites States Postal Service. Fold and tear along the perforated line to remove your pre-stamped postcard."

Over all, the cards were a great success, and I look forward to working more with that detachable format in the future.

All Play and No Work

The following are some fun things I put together for my office coworkers. 


"Snowigami" paper crane ornaments (I know, I'm too much...really, I should stop...and yet I don't), with stamped and mounted gift-tags that each had a personal holiday message.


Up-cycled letterpress calendar picture frames. These were taken from a beautiful letterpressed desktop calendar, and I simply cut the calendar portion out to create a photo mat for either a frame, bulletin board, or fridge. Each "page" was different and made for a nice addition to our cubicles.


I also bound a few single-signature notebooks using mostly up-cycled materials. The "B" features laminated Boston street/subway map endpapers, "L" uses illustrated book pages, and "V" uses a heavy stock book page for it's endpapers as well as a small branch for it's spine. Each uses paper taken from the office recycling bins, and features a letter corresponding to the recipient's name.

'Tis the Season to be Crafty

For my parents, who spend half their time on a surfer's/cattle ranch on the Central Coast of California, I crafted a ceramic cow mug in my pottery class.


Having never sculpted a cow before, nor having a picture of a cow to look at at the time, I'm proud, yes, but significantly more flabbergasted that it actually came out even remotely resembling what it was supposed to! A few of the spots came off in the kiln, but the naturally uneven "oatmeal" glaze certainly made up for the loss. And, when I went to collect it from the classroom, I found this note from another ceramics teacher (so nice!):


Another crafty experiment was the baby onesy I made for one of my best friends, who's expecting.
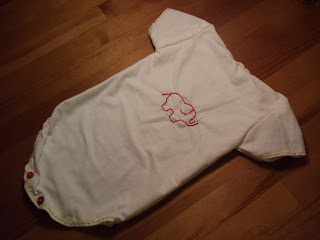

I used a machine-made onesy as a pattern, but just kind of held it up and drew around to get the dimensions (I can not recommend using an actual pattern for sewing enough haha gestimating was a pain). For this one I used a (new) Hanes white t-shirt that I had in my drawer, which worked pretty well in a pinch. I hand sewed everything using embroidery thread and doubled up my stitching, but using a sewing machine would probably give the stitching more stretch (and wouldn't take many hours). Instead of snaps, I reinforced some holes with an extra layer of material and a heavy dose of threading to prevent it from stretching or tearing, and used some cute red buttons. Then I free-handed a little elephant on the *coughbackwoopscough* (an embroidery hoop will stretch out the fabric so that it doesn't wrinkle, and a fabric store open at 5am in my neighborhood could have sold me one, but alas, no such hours of operation) and wrapped it up in a gift box.


Certainly an experiment, and a good first try, but I think I'll need to sort out the hiccups before I go too baby crazy. Luckily the soon-to-be mother gave me an A for effort.

Wedding Portfolio

Finally, we have a wedding present to a wonderful couple--high school sweethearts--that tied the proverbial knot in June.


The portfolio box is made from sturdy book board and picture matting, and is covered with a handmade Indian Lotka paper, and a handmade Japanese Yuzen paper. It measures 9" x 11" x 1".


The couple's names are typewritten on the Lotka paper and inset on the lid of the portfolio.


The ribbon weaves in and out of the box, through incisions in the book board, connecting the lid to the base, and tying in the front with the other end.


Inside is a photo mat and mounted wedding photograph, and will be joined by the various wedding keepsakes of the bride and groom.


A lasting happy new year to everyone, and thank you for supporting Warren Tales!